
Welcome to BSD Maggie Sew-A-Long Post #3 – Serger vs. Sewing Machine, How to Shorten/Lengthen your pattern, Cutting, and Shoulder Seam and Sleeve Insertion
Today, I am going to show you two different sewing methods that will work equally well on the Maggie Top, Tunic, & Dress, and we are going to get started sewing!
I had originally planned on breaking this down into three separate posts, but I want to get back on track, and they’re not very long topics, so I am combining them.
I have run across several beginner to intermediate seamstresses who believe they can’t sew knits because they don’t have a serger, which is false. Knits can be sewn on a standard sewing machine using a stretch or zig-zag stitch.
Sewing on a serger vs. standard sewing machine
I have partnered with some wonderful fabric companies for this sew-a-long, and when these arrived, my 18-year-old daughter, Harley laid claim to both of them. She asked for the dress version of the pattern with both, 3/4 sleeves in the stripe, and long sleeves in the solid red. I will have a detailed post for each fabric contributor next week.


These two dresses were identical in make except for the sleeve length and manner of construction. I sewed the entire striped dress on my serger except for the twin-needle hems on the arms and bottom. I made the entire red dress on my sewing machine.
With sergers, it is dangerous to pin perpendicular to the seam because hitting a pin can break knives and the broken pins are hazardous, especially if they become flying objects. For that reason, I pin parallel to the seam at a distance that allows my pins to move along the left of the presser foot.


When I made the red dress using my sewing machine, I used a zig-zag stitch and my walking foot. The zig-zag stitch allows the stitching to stretch with the fabric. Using the walking foot while sewing knits will prevent the fabric from stretching during sewing.

Melissa includes these plus additional tips for working with knits in the Maggie pattern.
HOW TO lengthen or shorten your pattern

I am lucky that I don’t need to lengthen or shorten patterns for my girls or myself, but if I were to sew something for my mom, I would have to shorten a great deal in the legs and lengthen a great deal in the torso. She is only 5’1″, but she has very short legs and a very long body.
Lengthening or shortening the Maggie is relatively easy because Melissa has already added cutting lines where it should be lengthened or shortened.
Simply cut the pattern at one of the lengthen/shorten lines. Add or subtract the amount desired based on measurements, and then re-blend the curve using a french curve if you have one. The example above shows a 1′ increase in pattern length. The process is the same for shortening the pattern, instead of spreading at the cut, you overlap the two pattern pieces the desired amount.
tracing pattern and cutting your fabric
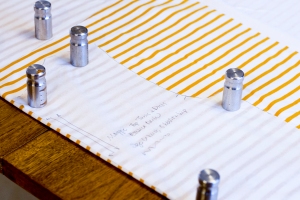
I talked a little bit in Post #2 about tracing your pattern once it’s finished, but I thought I would show a few pictures of what I do to provide a visual aid. After I print out the entire pattern, I lay it on my dining room table and I use Standard White Exam Table Paper to trace my pattern. It is really inexpensive, and the rolls last forever!

I use my pattern weights to hold the exam paper down while I trace the pattern; you can see the end of the roll in the picture above.
I follow a similar procedure when I cut my pattern out of fabric. After I get my fabric laid out nicely on our dining room table, I lay out the pattern pieces down and hold them in place with pattern weights.

It is a simple process from there to cut around the pattern pieces.
I have a simple trick I use for lining up stripes when I cut out the pattern (after I have made sure the stripes on both sides of my fabric line up). I select a spot on one pattern piece that coincides with most, if not all, the other pattern pieces. For the Maggie, I used the bottom corner of the arm scye on both torso pieces and the sleeve piece. I lined up the point of the corner with the bottom of one of the mustard lines. The result was nearly perfect stripe matching!

shoulder seams and sleeve insertion
With both dresses, the first steps are to sew up the shoulder seams and insert the sleeves. inserting the sleeves prior to sewing up the side seams is much much easier, and the fabric is much easier to manipulate into the curve of the shoulder.
After you sew the shoulder seams, it is time to insert the sleeves. With right sides together, match up center should notch and the front and back notches. Hold in place with pins, and then pin the remainder of the sleeves out to the end of the arm scye on both the front and back.

Once I got the shoulder on the striped material pinned perpendicularly, I switched the pins to run parallel to the seam to run through my serger.

The weight of the french terry vs. the drapiness of the DBP is very evident in these two pictures. Both shoulder seams pined and the DBP lays nearly flat while the french terry has some structure.
WHAT’S NEXT?
I will have some helpful hits and tips for attaching the neckband, and we will be attaching it and sewing up the side seams. In addition, I will have my first fabric contributor post with purchasing information.
Comment below if you have any questions, and I will see you soon for the next installment of our Sew-A-Long.
